Introduction
I’ve been a happy Standard Notes user for a while, but I wanted to take control of my data by self-hosting it. This way, my encrypted notes stay on my own infrastructure.
I’ll walk you through how I set up my own Standard Notes server using my Proxmox server, Caddy as a reverse proxy, pfSense for networking, and Cloudflare for DNS.
Architecture Overview
Here’s my setup:
- Frontend Web App: Running on Docker at
notes.domain.com - Backend API Server: Running on Docker at
notes-api.domain.com - Files Server: Running on Docker at
notes-sync.domain.com - Reverse Proxy: Caddy for SSL and routing
- DNS: Cloudflare with dynamic DNS through pfSense
- Domains:
notes.domain.com→ Frontend web appnotes-api.domain.com→ Backend APInotes-sync.domain.com→ Files server
Prerequisites
You’ll need these things before we begin:
- A Proxmox server (or any server that can run Docker)
- A domain name managed through Cloudflare
- pfSense set up with Cloudflare dynamic DNS
- Some basic knowledge of Docker and Docker Compose
Setting Up the Backend
The Standard Notes backend runs in Docker containers. I followed the official Docker guide with a few tweaks.
Step 1: Create the Working Directory
SSH into your Proxmox server and create a directory:
mkdir /opt/standardnotes
cd /opt/standardnotes
Step 2: Download Configuration Files
Download the necessary files:
# Download the environment template
curl https://raw.githubusercontent.com/standardnotes/server/main/.env.sample > .env

# Download the docker-compose file
curl https://raw.githubusercontent.com/standardnotes/server/main/docker-compose.example.yml > docker-compose.yml

# Download the LocalStack bootstrap script
curl https://raw.githubusercontent.com/standardnotes/server/main/docker/localstack_bootstrap.sh > localstack_bootstrap.sh
chmod +x localstack_bootstrap.sh
Step 3: Configure Environment Variables
Edit the .env file:
nano .envHere are the key changes I made:
######
# DB #
######

DB_HOST=db
DB_PORT=3306
DB_USERNAME=your_db_username
DB_PASSWORD=your_secure_password
DB_DATABASE=standard_notes_db
DB_TYPE=mysql

#########
# CACHE #
#########

REDIS_PORT=6379
REDIS_HOST=cache
CACHE_TYPE=redis

########
# KEYS #
########

# Generate these with: openssl rand -hex 32
AUTH_JWT_SECRET=your_generated_jwt_secret
AUTH_SERVER_ENCRYPTION_SERVER_KEY=your_generated_encryption_key
VALET_TOKEN_SECRET=your_generated_valet_token

###############
# API GATEWAY #
###############
PUBLIC_FILES_SERVER_URL=https://notes-sync.domain.com
DISABLE_USER_REGISTRATION=true
AUTH_SERVER_DISABLE_USER_REGISTRATION=true
COOKIE_DOMAIN=notes-api.domain.com
Step 4: Update Docker Compose Configuration
Edit the docker-compose.yml file to update the database passwords:
nano docker-compose.ymlUpdate the MySQL environment variables to match your DB_PASSWORD from the .env file:
services:
  db:
    environment:
      MYSQL_ROOT_PASSWORD: your_secure_password  # Same as DB_PASSWORD in .env
      MYSQL_PASSWORD: your_secure_password       # Same as DB_PASSWORD in .env
Alternative: Using DBeaver for Database Management
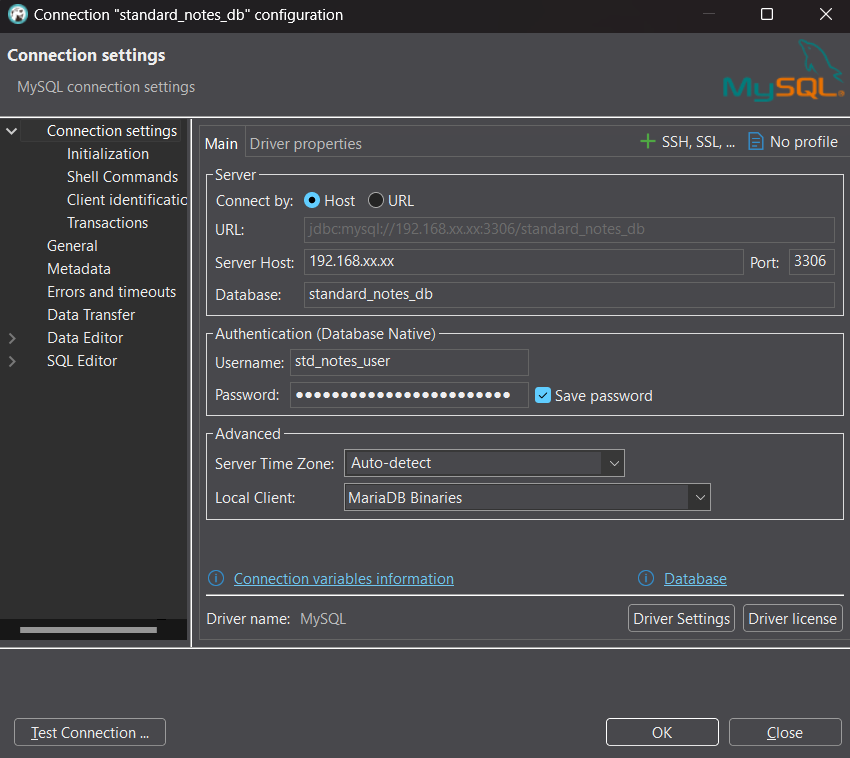
If you prefer using a GUI to manage the database, you can expose the MySQL port to your local network. Update the db service in your docker-compose.yml:
services:
  db:
    # ... existing configuration ...
    ports:
      - 3306:3306    # Instead of 'expose: [3306]'
Then you can use DBeaver or another MySQL client to connect with these settings:
- Host: Your server’s IP (e.g., 192.168.xx.xxx)
- Port: 3306
- Database: standard_notes_db
- Username: std_notes_user
- Password: Your DB_PASSWORD from .env
This makes it easier to manage users, subscriptions, and other database operations through a graphical interface.
Step 5: Deploy the Backend
Start the backend services:
docker compose pull && docker compose up -dCheck the logs to verify everything started correctly:
tail -f logs/*.logSetting Up the Frontend Web App
The frontend web app is much simpler to set up. I used the official Standard Notes Docker image from Docker Hub.
Note: I did find this community maintained image that customizes the web app, but I am not using it so.. 🤷♂️ If you want to use it, you can find it here.
Run the following command to start the web app:
docker run -d -p 3003:80 --name standardnotes-web standardnotes/webThe web app should now be accessible at http://your-server-ip:3003. I chose port 3003 to avoid conflicts with other services, but you can change this to any available port on your machine.
Network and SSL Configuration
For this setup, we need three subdomains with SSL certificates:
notes.domain.com→ Frontend web appnotes-api.domain.com→ Backend APInotes-sync.domain.com→ Files server
I use Caddy as a reverse proxy with automatic SSL certificates, pfSense for routing, and Cloudflare for DNS management. I’ve documented this infrastructure setup in detail in my Caddy, pfSense, and Cloudflare Setup Guide.
Step 1: Add DNS Records
Follow the Cloudflare DNS setup from the guide above, but create three A records:
Type    Name       Content
A       notes      1.1.1.1
A       notes-api  1.1.1.1
A       notes-sync 1.1.1.1
Step 2: Configure Dynamic DNS in pfSense
Create three dynamic DNS entries in pfSense (Services → Dynamic DNS):
-
Frontend Web App:
- Hostname: notes
- Domain: domain.com
- Cloudflare Proxy: Enabled
-
Backend API:
- Hostname: notes-api
- Domain: domain.com
- Cloudflare Proxy: Enabled
-
Files Server:
- Hostname: notes-sync
- Domain: domain.com
- Cloudflare Proxy: Enabled

Step 3: Caddy Configuration
Add these entries to your Caddyfile:
notes.domain.com {
    reverse_proxy 192.168.xx.xx:3003
}

notes-api.domain.com {
    reverse_proxy 192.168.xx.xx:3000
}

notes-sync.domain.com {
    reverse_proxy 192.168.xx.xx:3125
}
Replace 192.168.xx.xx with your server’s local IP address.
After adding these entries:
sudo caddy fmt --overwrite /etc/caddy/Caddyfile
sudo caddy validate --config /etc/caddy/Caddyfile
sudo systemctl reload caddy
Important Configuration Notes
-
Disable User Registration: I set
DISABLE_USER_REGISTRATION=true&AUTH_SERVER_DISABLE_USER_REGISTRATION=trueso only I can create accounts. I don’t know if you need both, but it worked for me 🙃 -
Cookie Domain: Setting
COOKIE_DOMAIN=notes-api.domain.comis important for authentication to work correctly. Otherwise, you’ll get a infanite login loop.
Both of these settings are undocumented, I found them searching the GitHub repo
- Default Sync Server: Currently there is no way to set the default sync server in the web app. You have to manually set it EVERYTIME you log in or create a new account. You could technically build your own web app and host it instead, but I’m not going to go into that here. You can find the source code here.
- Official Web App Limitation: Due to Content Security Policy restrictions, you cannot use the official Standard Notes web app (
app.standardnotes.com) with your self-hosted backend. The web app only allows connections to Standard Notes’ own domains. However, the desktop and mobile apps work perfectly with self-hosted backends since they don’t have browser CSP restrictions. For web access, you must use your own self-hosted frontend (notes.domain.com).
What works with self-hosted backends:
- ✅ Official desktop apps (Windows, macOS, Linux)
- ✅ Official mobile apps (iOS, Android)
- ✅ Your self-hosted web frontend (
notes.domain.com)
What doesn’t work:
- ❌ Official web app (
app.standardnotes.com) - blocked by browser CSP
Creating Your First User
Since registration is disabled, you need to create your account manually. You can do this by temporarily enabling registration, creating your account, and then disabling it again.
Testing Your Setup
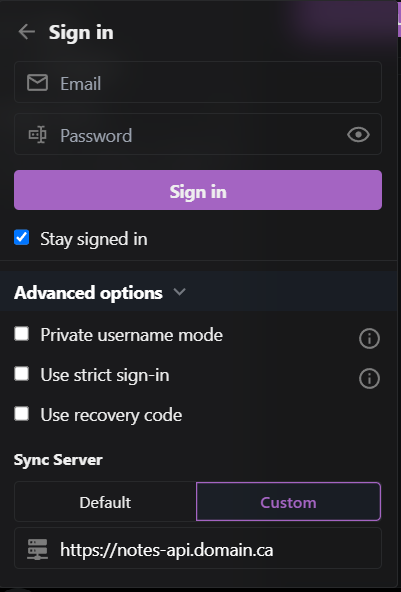
- Visit your web app: Go to
https://notes.domain.com - Configure sync server: In the account menu, go to “Advanced options” and set your custom sync server to
https://notes-api.domain.com - Create or log into your account
- Test file uploads to verify the files server is working
Maintenance and Updates
Updating the Backend
cd /opt/standardnotes
docker compose down
docker compose pull
docker compose up -d
Updating the Web App
# Stop and remove the old container
docker stop standardnotes-web
docker rm standardnotes-web

# Pull the latest image and start a new container
docker pull standardnotes/web
docker run -d -p 3003:80 --name standardnotes-web standardnotes/web
Subscriptions and Premium Features
Offline Subscriptions
To get access to all premium features (both client-side and server-side), you need to purchase an offline subscription. This is different from regular subscriptions and is offered at a discount for self-hosters.
To purchase and activate an offline subscription:
- Go to standardnotes.com/purchase/offline
- Complete the purchase to receive an offline features code via email
- Open the Standard Notes web or desktop app
- Go to Preferences → General → Offline activation
- Paste your code in the “Activate Offline Subscription” section
Server-Side Subscription
For server-side features only, you can add a subscription to your self-hosted account. Replace EMAIL@ADDR with your account email:
# Add PRO_USER role
docker compose exec db sh -c "MYSQL_PWD=\$MYSQL_ROOT_PASSWORD mysql \$MYSQL_DATABASE -e \
  'INSERT INTO user_roles (role_uuid , user_uuid) VALUES ((SELECT uuid FROM roles WHERE name=\"PRO_USER\" ORDER BY version DESC limit 1) ,(SELECT uuid FROM users WHERE email=\"EMAIL@ADDR\")) ON DUPLICATE KEY UPDATE role_uuid = VALUES(role_uuid);' \
"

# Add subscription
docker compose exec db sh -c "MYSQL_PWD=\$MYSQL_ROOT_PASSWORD mysql \$MYSQL_DATABASE -e \
  'INSERT INTO user_subscriptions SET uuid=UUID(), plan_name=\"PRO_PLAN\", ends_at=8640000000000000, created_at=0, updated_at=0, user_uuid=(SELECT uuid FROM users WHERE email=\"EMAIL@ADDR\"), subscription_id=1, subscription_type=\"regular\";' \
"
You could also use the DBeaver GUI to add the subscription.
Note: Server-side subscriptions only enable server features. For client-side features like Super notes and Nested tags, you’ll need an offline subscription.
Conclusion
Self-hosting Standard Notes gives you full control over your notes. With Docker, Caddy, and a good network setup, you get a secure and private notes platform.
This setup gives you:
- Complete data ownership
- Automatic SSL
- A scalable setup
- Secure access
Now you can sync your notes across all your devices, knowing they never leave your server.
Useful Resources
- Standard Notes Self-hosting Documentation
- Standard Notes Web App Docker Guide
- Standard Notes GitHub Repo
- Caddy Documentation
- Docker Compose Documentation