Introduction
When I started my self-hosting journey, one of the biggest challenges was setting up reliable infrastructure that could handle multiple services, automatic SSL certificates, and dynamic DNS updates. After trying various combinations, I settled on a powerful trio: pfSense for routing and firewall, Cloudflare for DNS management, and Caddy for reverse proxy with automatic HTTPS.
This setup has been rock-solid for over a year, handling my Standard Notes, Immich, and various other self-hosted applications. In this guide, I’ll walk you through exactly how to replicate this infrastructure.
For this guide let’s assume you have Immich installed on your server running at 192.168.1.11:2283 and you want to access it from the internet at immich.domain.com and you have caddy running on your server running at 192.168.1.100.
Architecture Overview
Here’s what we’re building:
Internet → Cloudflare DNS → pfSense Router → Caddy Reverse Proxy → Your ServicesKey Components:
- pfSense: Acts as router, firewall, and DHCP server
- Cloudflare: Manages DNS records with automatic updates
- Caddy: Reverse proxy with automatic Let’s Encrypt SSL certificates
- Dynamic DNS: Keeps your home IP address synchronized with Cloudflare
Prerequisites
Before we begin, you’ll need:
- A domain name (can be purchased through Cloudflare or transferred)
- pfSense installed and configured as your router/firewall
- Immich (or another service) running on your local network
- A server/VM for running Caddy (I use Proxmox)
- A Cloudflare account (free tier works fine)
Part 1: Cloudflare DNS Setup
Step 1: Add Your Domain to Cloudflare
- Create a Cloudflare account at cloudflare.com
- Add your domain by clicking “Add a Site”
- Choose the Free plan (sufficient for most self-hosting needs)
- Update your domain’s nameservers to point to Cloudflare’s nameservers
Step 2: Configure DNS Records
If you already have DNS records, you’ll need to transfer any existing records to Cloudflare.
Type    Name              Content
A       @                 YOUR_PUBLIC_IP
A       *                 YOUR_PUBLIC_IP
CNAME   www               domain.com
Step 3: Add Your Subdomain
Before setting up dynamic DNS in pfSense, we need to create the subdomain record in Cloudflare first:
-
Navigate to DNS → Records in your Cloudflare dashboard
-
Click Add record
-
Configure the record:
- Type: A
- Name: immich (this will create immich.domain.com)
- IPv4 address: 1.1.1.1 (temporary placeholder)
- Proxy status: DNS only (gray cloud - disabled)
- TTL: Auto
-
Save the record
Note: We’re using 1.1.1.1 as a placeholder IP address for now. pfSense will automatically update this with your real public IP address once we configure dynamic DNS.
Step 4: Get Cloudflare API Token
We need an API token for pfSense to update DNS records automatically:
- Go to Cloudflare Dashboard → Profile → API Tokens
- You’ll need a Global API Key or API token with DNS edit permission on the provided zone.
Note: You can use the Global API Key or create a specific API token with DNS edit permission on the provided zone. It’s recommended to create a specific API token with DNS edit permission on the provided zone.
Part 2: pfSense Configuration
Assuming you already have pfSense installed and running with basic WAN/LAN configuration, we’ll focus on the specific settings needed for our self-hosting infrastructure.
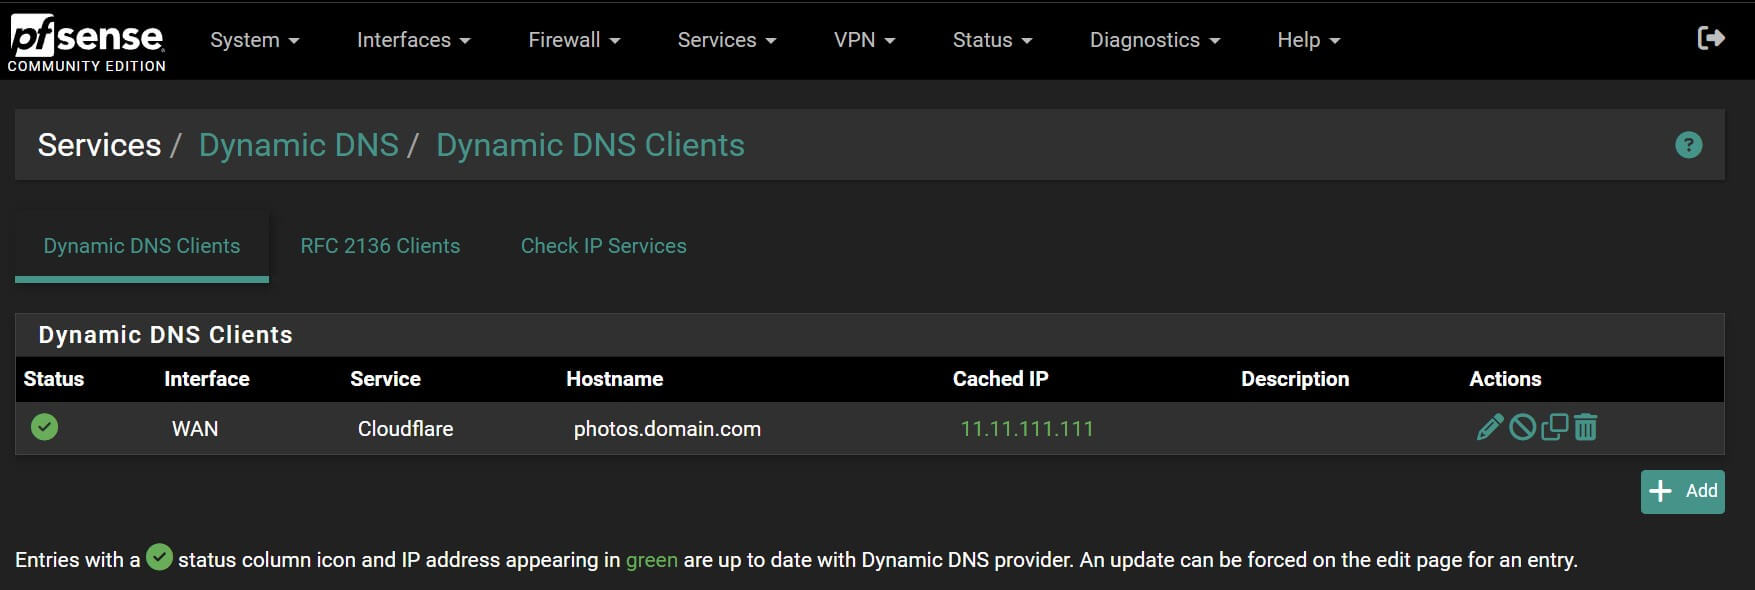
Step 1: Configure Dynamic DNS
This is where the magic happens - pfSense will automatically update your Cloudflare DNS records when your public IP changes. We need to create a dynamic DNS entry for our Immich subdomain.
- Navigate to Services → Dynamic DNS
- Click Add to create a new dynamic DNS entry
- Configure the settings:
Service Type: Cloudflare
Interface to Monitor: WAN
Hostname: immich
Domain: domain.com
Cloudflare Proxy: Enabled Proxy
Username: YOUR_CLOUDFLARE_EMAIL
Password: YOUR_CLOUDFLARE_API_TOKEN
Description: Immich Photo ManagementNote: “Cloudflare Proxy: Enabled Proxy” means traffic will be proxied through Cloudflare’s CDN, providing DDoS protection and caching.
- Save the entry and test the configuration
- Check the Status tab to ensure it’s working
- The DNS record should now be updated with your real public IP address instead of 1.1.1.1
Should look like this:
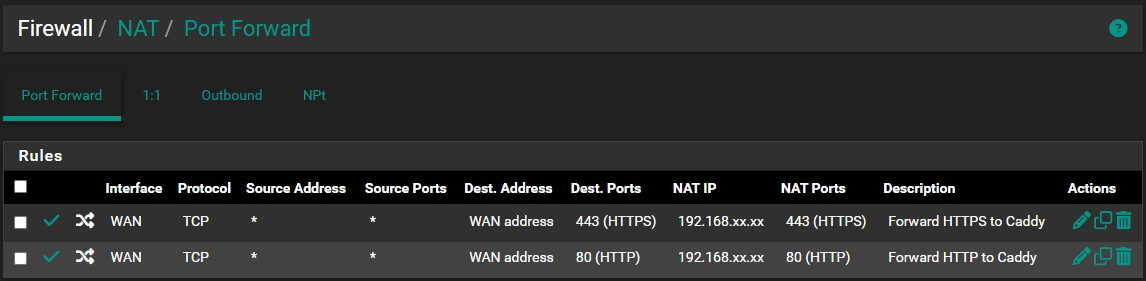
Step 2: Port Forwarding
Set up port forwarding to direct traffic to your Caddy server:
- Navigate to Firewall → NAT → Port Forward
- Add port forwarding rules for HTTP and HTTPS:
Configure your port forwarding like this:
HTTPS Port Forward:
- Interface: WAN
- Address Family: IPv4
- Protocol: TCP
- Destination: WAN address
- Destination Port Range: HTTPS (443)
- Redirect Target IP: Your Caddy server IP (e.g., 192.168.1.100)
- Redirect Target Port: HTTPS (443)
- Description: Forward HTTPS to Caddy
HTTP Port Forward:
- Interface: WAN
- Address Family: IPv4
- Protocol: TCP
- Destination: WAN address
- Destination Port Range: HTTP (80)
- Redirect Target IP: Your Caddy server IP (e.g., 192.168.1.100)
- Redirect Target Port: HTTP (80)
- Description: Forward HTTP to Caddy
Your configuration should look like this:
Part 3: Caddy Configuration
For this setup, you’ll need Caddy running somewhere on your network. I’m running it on my Proxmox server in an LXC container. Which I installed using the Proxmox Helper Scripts.
Step 1: Basic Caddyfile Configuration
If your using Proxmox like me, open the terminal in the container and run the following commands:
nano /etc/caddy/CaddyfileCreate or edit the Caddyfile at /etc/caddy/Caddyfile:
# Immich photo management
immich.domain.com {
	reverse_proxy 192.168.1.11:2283
}
Save with CTRL + O and exit with CTRL + X.
This simple configuration tells Caddy to:
- Listen for requests to
immich.domain.com - Automatically obtain and manage SSL certificates
- Forward requests to your Immich server at
192.168.1.11:2283
Format and validate your Caddyfile:
sudo caddy fmt --overwrite /etc/caddy/Caddyfile
sudo caddy validate --config /etc/caddy/Caddyfile
Step 2: Enable and Start Caddy
# If it's the initial setup
sudo systemctl enable caddy

# If you're adding or changing services
sudo systemctl start caddy

# Check status
sudo systemctl status caddy
You can view the logs with:
sudo journalctl -u caddy.serviceStep 3: Test Your Setup
- Wait for DNS propagation useally pretty quick but if it’s not working try again in a few minutes.
- Visit your Immich instance:
https://immich.domain.com- You should see the Immich login page
- The connection should be secure (HTTPS)
- Check SSL certificate: Should show as valid Let’s Encrypt certificate
- Monitor Caddy logs for any issues:
sudo journalctl -u caddy.service -f
Adding More Services
Once you have this basic setup working with Immich, adding additional services is straightforward:
- Add a new dynamic DNS entry in pfSense for each new subdomain
- Add the service configuration to your Caddyfile:
# Add more services here nextcloud.domain.com { reverse_proxy 192.168.1.12:80 } homeassistant.domain.com { reverse_proxy 192.168.1.13:8123 } - Reload Caddy to apply the changes:
sudo systemctl reload caddy
The infrastructure you’ve built will automatically handle SSL certificates and DNS updates for any new services you add.
Conclusion
This infrastructure setup has served me incredibly well for self-hosting multiple services. The combination of pfSense, Cloudflare, and Caddy provides:
- Reliability: Automatic DNS updates and SSL certificate management
- Security: Robust firewall, DDoS protection, and automatic HTTPS
- Scalability: Easy to add new services with minimal configuration
- Maintainability: Automated updates and clear monitoring
The initial setup requires some effort, but once configured, it easy to add more services.